Author: fasweet

  • Common Errors on Private and Commercial check rides

    Common Errors on Private and Commercial Check Rides

    Check rides often reveal the same weak areas again and again. This guide outlines common trouble spots for private and commercial applicants, along with practical recommendations to help you prepare more effectively and demonstrate sound judgment.

    Aircraft Airworthiness

    Applicants must prove to the examiner that the aircraft is airworthy both on paperwork during the ground portion and by preflight inspection before takeoff. Many applicants have memorized AVIATE-A and AROW, but are not familiar enough with the logs to demonstrate that they can actually verify airworthiness.

    1. Produce originals or facsimiles of the airworthiness certificate, registration, weight and balance, and POH/AFM. Aircraft manufactured after March 1979 must have an aircraft-specific FAA-approved POH.
    2. Tab the engine, airframe, and propeller log entries for required inspections so they are easy to reference.
    3. Be ready to explain Airworthiness Directives. Owner-operators are required to keep a log of all applicable ADs, including how and when they were complied with, recurrent AD status, and next due dates. This AD compliance report is usually updated every annual.

    Weather

    Review the ACS requirements carefully. In short, the applicant must be able to retrieve enough weather information and interpret it correctly to build a picture of current and forecast conditions and make a sound go or no-go decision. If you use an aviation app briefing, make sure you know where the legends are and how to interpret the symbols.

    1. Understand the basic concepts of how weather is created and how air masses and fronts produce different conditions.
    2. Become familiar with onboard weather products such as ADS-B In, TIS-B, FIS-B, and XM weather, along with their limitations.
    3. Know what radar can and cannot tell you, including how to identify thunderstorm activity and interpret color returns.
    4. Be able to explain low-level wind shear, what causes it, and the risks it creates.
    5. For every chart in a weather briefing, know what the symbols mean or where to look them up quickly.

    Cross-Country Planning

    A common error is taking a course directly from Garmin Pilot or another app without understanding whether it is a true course, magnetic course, magnetic heading, or compass heading. Some applicants then apply wind correction or deviation to a number the app has already corrected, creating navigation errors they cannot explain.

    Know what your app is telling you and what each number means. You should also understand how to determine a true course from a VFR sectional and convert it to a magnetic heading and then a compass heading. Use the expanded PAVE checklist as part of your planning process.

    Diversions for Emergencies and Malfunctions

    Applicants often begin troubleshooting while flying away from a perfectly good airport. If you face a malfunction that may threaten the safety of flight, prioritize getting pointed toward a safe landing option first.

    1. Turn toward the closest airport.
    2. Then begin troubleshooting or use the checklist.
    3. If the engine is still running, use the available power to reach a safe landing area.

    Aircraft Performance

    Cross-country planning often leads directly into aircraft performance questions. Applicants should be comfortable using charts and applying the numbers in real situations.

    1. Know how to use performance charts, including how to calculate pressure altitude anywhere the aircraft may be, including cruise.
    2. Know how to convert TAS into groundspeed.
    3. Understand the practical relationship between IAS and TAS as altitude increases.
    4. Know what takeoff and landing speeds to use at high-density-altitude airports and how density altitude affects performance.
    5. Understand the relative effects of weight, pressure, temperature, and altitude on performance.
    6. Know how to lean for maximum performance at high-altitude takeoff and cruise, and what the POH recommends.
    7. Understand how grass, wet, dry, and sloped surfaces affect takeoff and landing performance.
    8. Know how bank angle and aircraft loading affect stall speed, and whether your aircraft can stall at 100 knots.
    9. Understand how CG location affects aircraft performance.
    10. Use the ACS to review the full range of possible questions.

    Night Operations

    Because many applicants have limited night experience, this area can turn into a difficult memorization exercise. Think through every phase of flight, from preflight planning and aircraft inspection to taxi, takeoff, en route operations, airport identification, and landing. Consider the risks in each phase and how you would prepare for and mitigate them.

    Use the PAVE checklist to organize your thinking. Consider how you would maintain aircraft control with reduced visual references, especially over featureless terrain, and what visual aids you would use in the cockpit and airport environment.

    Private Pilot IMC Judgment

    For a private pilot, flying into IMC while operating VFR is an emergency. Good judgment means planning a rapid exit, such as a 180-degree turn, and calling for help or declaring an emergency if needed. Pilots should know the emergency frequency, 121.5, without having to look it up.

    Several students try to pull up weather on an iPad and then navigate on their own to a VFR airport while in IMC. That demonstrates poor judgment and may violate regulations. Know how to use the onboard navigation equipment so you can follow ATC instructions and get back to VFR conditions safely.

    Emergency Descent and Engine Failure

    Know the reasons for an emergency descent and be ready to execute it correctly.

    1. Clear the area first.
    2. Perform memory items.
    3. Execute the maneuver as described in the Airplane Flying Handbook and ACS.
    4. Use the aircraft configuration recommended in the POH.
    5. Review the ACS guidance, including the use of 30 to 45 degrees of bank and power-off technique where appropriate.

    For engine failures, remember that the approach to landing is not the same as an emergency descent. Think ABCD: airspeed for best glide, best place to land, checklist if time permits, and door cracked open. Do not waste time debating between unsuitable landing spots. Land into the wind when possible and use flaps as appropriate.

    1. In a high pitch and power situation such as takeoff, put the nose down immediately after an engine failure.
    2. The turn back to the runway should only be attempted if you have practiced it and know your aircraft can do it safely. It is called the impossible turn for a reason.

    Takeoffs and Landings

    1. Do not forget crosswind correction on every takeoff and landing.
    2. A common mistake is carrying excess speed on final, then pulling power late and destabilizing the approach.
    3. Go-arounds are always a smart option if the approach is unstable.
    4. Do not improvise something new on a check ride.
    5. Do not force the aircraft onto the runway to salvage a short-field landing. Go around.
    6. All landings are graded on touchdown attitude, which should be nose high on the mains.
    7. Soft-field landings are often easier with a small amount of power carried into touchdown to reduce sink rate.
    8. Excess speed creates float, ballooning, skipping, porpoising, and missed touchdown points.
    9. Unless instructed otherwise, all landings should be full stop and taxi back. If you are used to touch and goes, be cautious.
    10. Be on target approach speed no later than final. If you are high and fast or low and slow, a go-around may be the better choice.
    11. Diving for the runway never works. Extra altitude simply turns into extra speed and float.

    Stalls

    Insufficient pitch attitude can lead to a waffling or falling-leaf effect without a clear buffet or break, making it difficult to identify the stall and recover promptly. On the other hand, pulling too aggressively can create dramatic wing drops and a more difficult recovery. Slow down, take your time, and use the pitch attitude you were taught.

    For private pilot applicants, stalls are to the full stall. For commercial applicants, stalls are to the first indication.

    Steep Turns

    Read the ACS and the Airplane Flying Handbook carefully. This is an outside-reference maneuver. Practice with the instruments covered to improve your visual references, and always scan for traffic. If you have synthetic vision, turn it off and look outside.

    The strongest check ride preparation combines knowledge, judgment, and disciplined flying. Study the ACS, know your aircraft, and avoid trying to rescue unstable situations.

    Final Preparation

    Use the ACS as your master checklist, organize your materials before the practical test, and practice making calm, conservative decisions. Strong preparation is not just about memorizing answers. It is about demonstrating that you can think clearly, manage risk, and operate safely.
  • On the use of Touch and Goes vs Full Stop Taxi back

    On the use of Touch and Goes vs Full Stop Taxi back

    Touch and go practice can build repetition, but I do not recommend using it as the primary training method for landing instruction. In my view, full stop taxi backs usually produce better learning, better judgment, and better long-term skill retention.

    Why I do not recommend touch and goes

    1. There is no time for an adequate debrief or for the student to self-evaluate the maneuver using a student-centered or collaborative assessment approach.
    2. If the student does not self-evaluate, the instructor cannot know whether the student understands what went wrong or how to correct it.
    3. It is not realistic to how we normally fly and does not align well with scenario-based training.
    4. After-landing and before-takeoff checklists are often skipped.
    5. It can repeat potentially bad habits that later become very difficult to change.
    6. The high workload encourages shortcuts and mistakes.
    7. It teaches students that checklists are not important.
    8. The transition to retractable gear aircraft increases the risk of raising the gear instead of the flaps, or making a gear-up landing.
    9. Touch and goes, a form of block practice, may improve motor skills, but often at the expense of learning, understanding, and broader application of the maneuver.
    10. It may fool the instructor into thinking the student has acquired the skill. If a student makes two or three good landings after doing fifteen in a row, that does not mean they will be able to repeat that performance tomorrow. Check again on another day.

    Why full stop taxi backs often work better

    My perspective is that students often learn to land proficiently in a shorter amount of time with full stop taxi backs. This method creates time to think, evaluate, reset, and use the appropriate checklists. It also better reflects the way most pilots actually operate aircraft outside of repetitive training patterns.

    In a crisis or under stress, we do not rise to the occasion. We perform at the lowest level of our training. That is one reason I prefer a training method that reinforces deliberate procedures, sound judgment, and consistent checklist use.

    Practical limitations

    Full stop taxi backs are not always practical at a busy towered airport. In those cases, consider going to a smaller uncontrolled airport if one is available. Touch and goes still have a place, but they should not be used as the primary training maneuver.

    Touch and goes have their place, but they should support training, not define it.

  • How Control Surfaces Work

    How Control Surfaces Work

    It is a common misconception that control surfaces work by simply “deflecting air.” Control surfaces do deflect air, but not by merely hanging out in the breeze so the airstream strikes the surface and is redirected. Most control surfaces are displaced by incredibly small amounts at most flying airspeeds, yet they still produce strong forces that change the attitude of the aircraft.

    It is the change in angle of attack created by the control surface that causes an acceleration of the air perpendicular to the relative wind, producing lift or an aerodynamic force substantially greater than a simple deflection effect. This is the key idea behind how these surfaces actually work. See the following discussion and diagrams.

    Control Surfaces

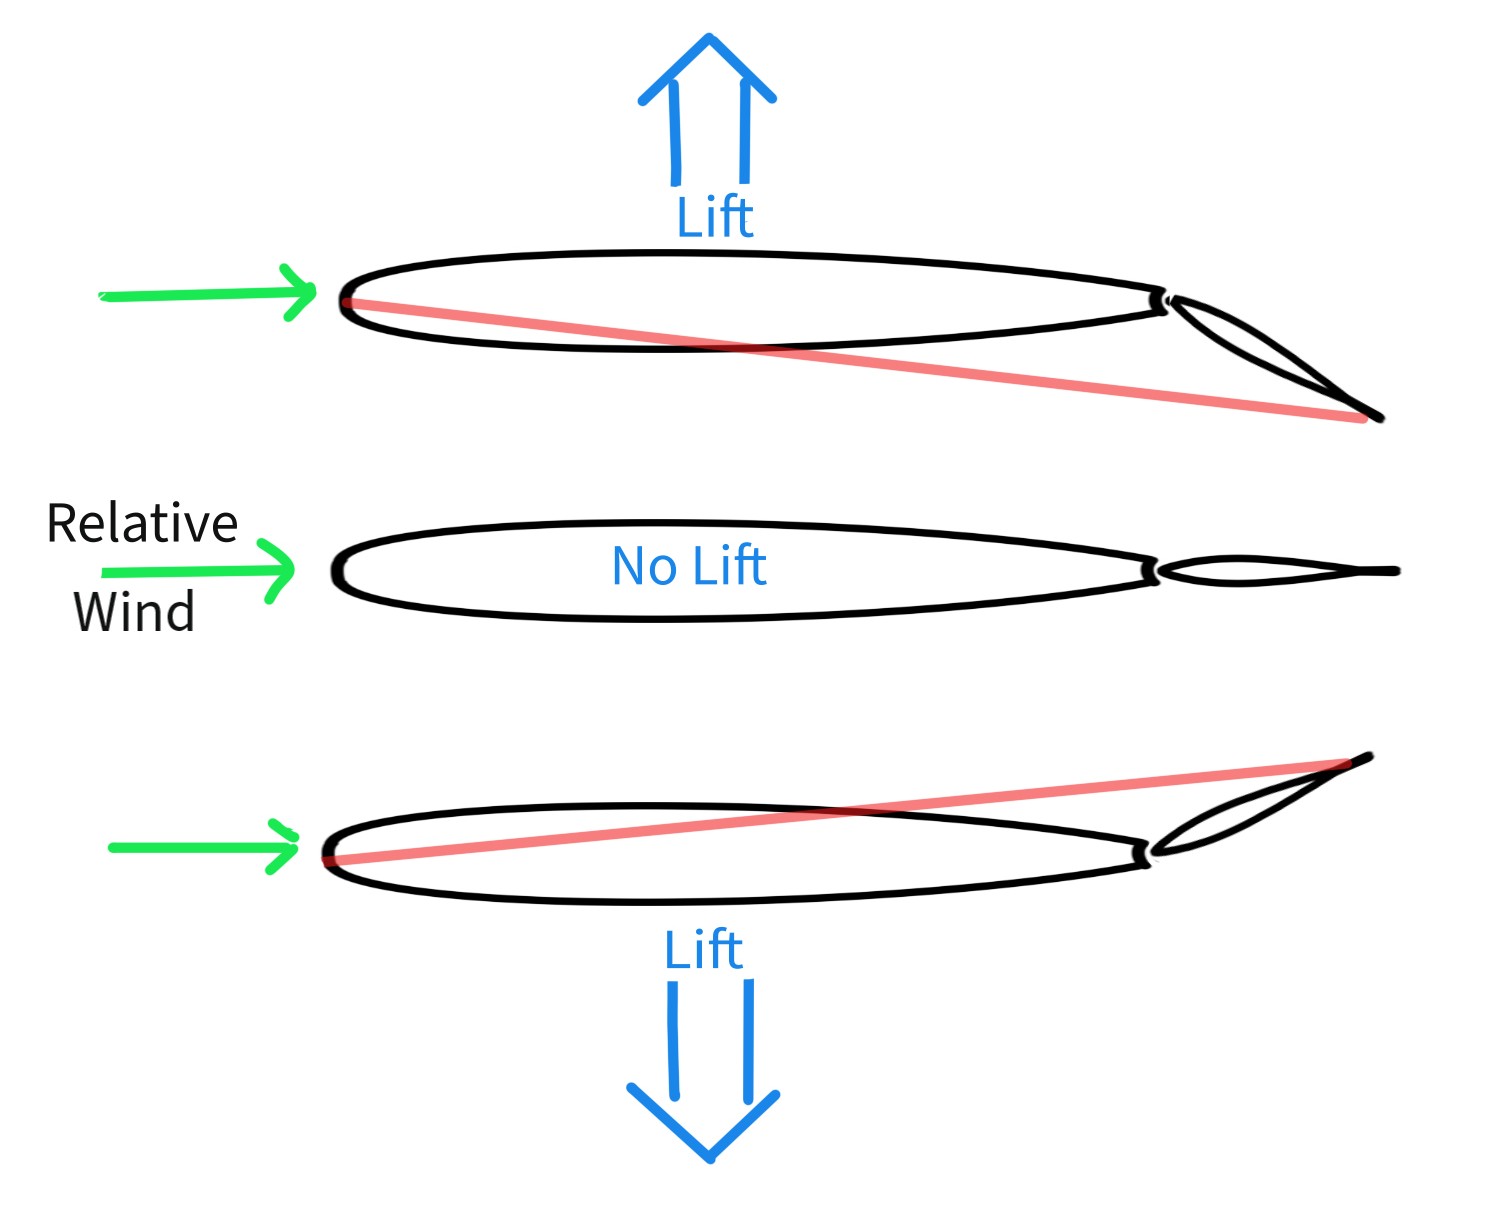
    Rudder, elevator, and trim tabs all operate on the same aerodynamic principles. The horizontal and vertical stabilizers are typically symmetric airfoils, which have a symmetric pressure distribution and produce zero lift at zero degrees angle of attack. When the elevator or rudder is displaced, the chord line changes and these airfoils can efficiently produce lift in either direction.

    Cambered airfoils can also produce lift in either direction, but they require significant angle of attack below zero to produce negative lift. It is another common misconception that the displacement of the control surface simply causes the airstream to impact and deflect, producing the required pitch or yaw moments. In reality, the force generated by direct impact of the free airstream against a displaced control surface is very small compared with the lift force generated through the angle of attack created by that same control surface.

    Symmetric airfoil angle of attack diagram for Figure 25

    Figure 25

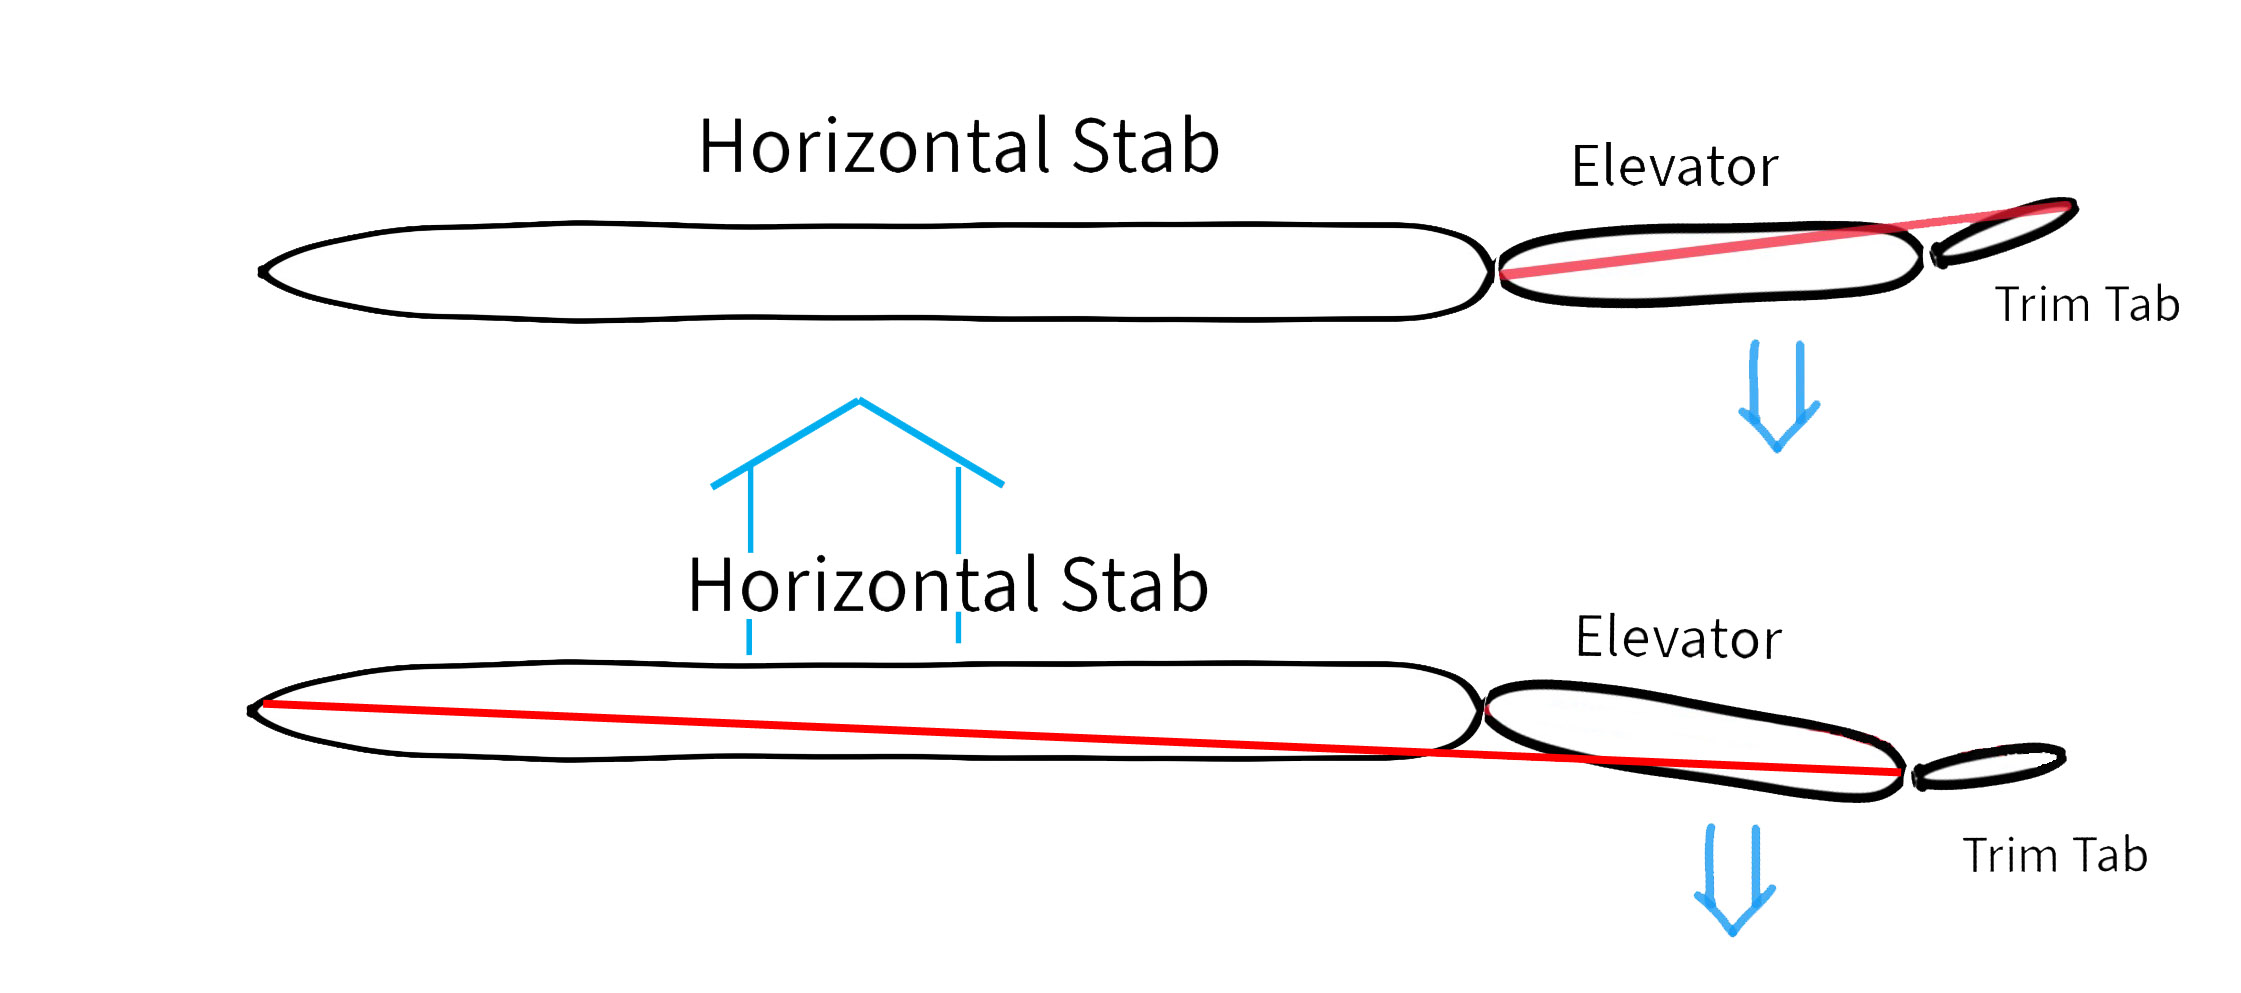
    Trim tabs work in the same way as other control surfaces. However, trim tabs move opposite the desired primary control surface direction. In the diagram below, the local negative angle of attack moves the elevator down until it reaches equilibrium with other aerodynamic forces or reaches zero local angle of attack. The elevator then displaces downward, causing the angle of attack to increase in the horizontal stabilizer. This creates lift in the upward direction on the horizontal stabilizer, moving the tail up and the nose down as the aircraft rotates around its center of gravity.

    Trim tab diagram for Figure 26

    Figure 26

    The elevator changes the pitch of the aircraft relative to the head and feet of the pilot. If the aircraft is in level flight, moving the controls aft moves the nose up toward the pilot’s head. Moving the controls forward moves the nose down toward the pilot’s feet. In a 90° bank, moving the control aft moves the nose inside the turn, while moving the control forward moves the nose outside the turn. In a level 45° bank, moving the control aft moves the nose toward the pilot’s head, which results in an equal amount of nose travel vertically and horizontally into the turn.

    In all cases, there is a turning of the aircraft along the axis between the pilot’s head and feet. Turning flight includes a curved flight path in the horizontal plane, the vertical plane, and anywhere in between. This is directly related to the loads experienced in turns.

    The elevator is the primary control of angle of attack and load in most regimes of flight. In positive-G flight, moving the control aft increases load and angle of attack, while moving it forward reduces load and angle of attack. The opposite is true for inverted, negative-G flight. In either case, the change in load is produced by turning flight.

    For example, as we pitch up to a climb attitude, there is a brief period of turning flight where both the angle of attack and load factor increase. This is commonly experienced if the aircraft is rotated briskly on takeoff and the stall warning horn chirps. Once the pitch attitude and climb rate stabilize, the aircraft is no longer turning and the load factor returns to 1. Similarly, in level flight or during stall recovery, if we pitch down briskly, we enter a brief moment of turning flight with a load factor opposite gravity, experienced as negative Gs and a light feeling in the seat.

    If we roll into a bank, the horizontal component of lift initiates a turn and increases the load on the aircraft. However, the elevator remains the primary control of angle of attack and load. While in a level turn, if we pull the control stick aft, we increase angle of attack and total lift. This tightens the turn by increasing the rate of turn and decreasing the turn radius.

    Rudder, Roll, and Coordination

    Application of the rudder produces a side force by increasing angle of attack to yaw the aircraft. There is a complex interaction of aerodynamic forces that induces a roll in the same direction as the yaw. For a detailed discussion of the factors involved, see John Denker’s discussion at AV8n.com.

    The rudder controls yaw and therefore affects slips, skids, coordination, and the direction of the aircraft on solid surfaces.

    Understanding control surfaces means understanding that the real force comes from aerodynamic lift created by angle of attack, not simple air deflection.

    From the Flight Instructors Training Manual, Aerodynamics for the CFI, Fred A Sweet

  • Determining Airworthiness on a check ride

    Determining Airworthiness on a Check Ride

    Aircraft airworthiness is a critical part of every practical test. Applicants must show the examiner that the aircraft is airworthy on paper during the ground portion and airworthy by preflight inspection before takeoff. Many applicants have memorized AVIATE-A and AROW, but are not familiar enough with the logs to demonstrate that they can truly verify airworthiness.

    Applicants should be prepared to produce originals or facsimiles of the airworthiness certificate, registration, weight and balance information, and POH/AFM. Aircraft manufactured after March 1979 must have an FAA-approved POH specific to the aircraft’s N-number and serial number.

    Required Inspections and Records

    Pitot-static and transponder tests are commonly discussed during check rides. The transponder receives altitude information from the pitot-static system through an encoder. These tests are typically completed together and are required every 24 months. For VFR operations, only the transponder check is required.

    ELT inspections are required annually, just like the annual inspection. The ELT inspection is often documented during the annual. It is common to see the ELT battery due date recorded, but no reference that the ELT was tested in accordance with 14 CFR 91.207.

    Flying Beyond Inspection Dates

    Occasionally, applicants attempt to use an aircraft with a transponder inspection beyond the 24-month requirement, reasoning that the test airport does not require a transponder under 14 CFR 91.215. This is not acceptable. If the equipment has not been verified as required, there is no assurance the transponder is reporting altitude accurately.

    You also cannot simply turn the transponder off, because 14 CFR 99.13 requires the transponder to be turned on during operations in the United States. A non-functional or inaccurate transponder creates safety concerns for ATC and other ADS-B In equipped aircraft. It also demonstrates poor aeronautical decision-making and a willingness to cut corners at the expense of safety. Examiners are required to evaluate ADM and judgment.

    Airworthiness Directives

    Aircraft owners and operators are required to keep a log of all applicable Airworthiness Directives, including the current status of each AD, the method of compliance, the date and aircraft time when complied with, and for recurring ADs, when the next action is due. This requirement comes from 14 CFR 91.417 and 43.9. This record is commonly called an AD compliance report.

    If you do not know where the AD compliance report is or how to read it, you cannot prove airworthiness. This report is usually updated at every annual inspection and must be signed by the A&P with their certificate number.

    The AD Verification Process

    Verifying AD compliance takes time. If done manually, the process requires collecting ADs for the airframe, engine, propeller, avionics, and any installed STCs using serial numbers and FAA resources. Many maintenance facilities use subscription software to streamline this process, but even then, the logs must still be reviewed to determine which ADs apply and whether they have been properly complied with.

    Once verified, the AD record is often printed in a spreadsheet-style format, signed by the A&P, and placed in the maintenance records. It should be updated at least annually to account for new or revised ADs. While the FAA does not define a specific date for “recent,” annual updating is common accepted practice. Without this reference, a pilot cannot verify airworthiness in a reasonable amount of time.

    AD logbook entries must contain the AD number, method of compliance, date and aircraft time when complied with, and for recurring ADs, when the next compliance action is due. Blanket entries such as “All ADs complied with this date” do not meet the requirement and cannot be used to prove compliance.

    Recommendations for Applicants

    • Tab the engine, airframe, and propeller inspection entries for quick reference.
    • Locate the AD compliance report and understand how to use it.
    • Identify recurring ADs and verify them in the maintenance logs.
    • Spot check one or two non-recurring ADs from the compliance list against the maintenance records.

    Preflight Still Matters

    Airworthiness also requires a proper preflight inspection. Applicants should know what they are looking for and use a checklist. Examiners may ask practical questions during preflight to confirm the applicant understands how to inspect the aircraft and evaluate its condition.

    • How large of a nick in the propeller is acceptable?
    • What are you checking on the nose strut?
    • What do the magnetos, starter, and alternator look like?
    • Are there loose antennas or flat spots on the tires?
    • Is the windshield clean?
    • How was the stall warning horn tested?
    • Which way should the elevator and ailerons move during control checks?
    • If the trim tab moves one direction, which way will the aircraft respond?
    • How was fuel quantity verified?

    Common Errors

    • Planning to look up ADs on the FAA website during the check ride.
    • Relying on a blanket maintenance entry stating all ADs were reviewed and complied with.
    • Using an old or missing AD compliance report.
    • Missing the POH front page with aircraft identifier for aircraft manufactured after March 1979.
    • Using an airworthiness certificate or registration that is missing, torn, or illegible.
    • Finding the annual inspection in one logbook but not checking the others.
    • Not understanding how the control surfaces work.
    • Being unable to identify airframe or engine components or explain how to inspect them.

    Airworthiness is not just a memory exercise. On a check ride, you must be able to prove it with documents, logs, and a competent preflight inspection.

    Strong preparation in this area shows sound judgment, attention to detail, and respect for operational safety. Those are exactly the qualities an examiner is looking for.